How to Hang a Chandelier

Hanging a chandelier

Chandeliers radiate elegance and accent entryways, dining areas and other rooms. Installing one or any other heavy pendant-style light is not much different than standard fixtures but they can often be hefty and cumbersome to handle while making wiring connections. Nevertheless, hanging a chandelier is something you can do as long as you know the right way to go about it.

Step 1: Choose the Perfect Light Fixture

The first step to properly installing a chandelier is finding the perfect one to install! When picking a light fixture, you must keep in mind the type and size of the room. A chandelier that is too small for your foyer or dining room won’t have the desired aesthetic effect and also may not provide enough light for the space. A fixture that is too large for the room will overwhelm the area and look out of place.

Square cahndelier

Before you go shopping for your fixture, measure the room. Find the length and the width, say 12’ by 12’. Add these together and “convert” the sum (24’) to inches (24”). So your fixture’s diameter should be approximately 24”. Keep in mind that the fixture doesn’t have to be exactly that size; size can vary by 2” or 3” without issue.

When deciding on the right-sized fixture to suspend over a dining table, take the table’s size into account as well. Measure the length and width or the diameter of the table, depending on the shape. The chandelier should be about 12” smaller than the width or diameter of the table.

Helpful Tip

Consider the height of the ceiling in the room. Tall ceilings need larger fixtures, so after measuring the room for chandelier size (again, in this example: 12’ x 12’=24”), choose a chandelier on the larger side (27” or so).

Safety Alert!

The bottom of the chandelier should be at least 7’ from the floor to avoid anyone from bumping their head on it if it’s not hanging over a table or in another area free of foot traffic.

When installing a chandelier to hang over a dining table, the fixture should hang directly above the table. In general, the bottom of your dining room chandelier should hang about 30” above the table.

Step 2: Turn Off Power

Deactivate electrical power to the room where you’re working by turning it off at the main electrical box. If you’re unsure which circuit it is, you can also shut off power to the entire house by turning off the main circuit breaker. Verify that power is off using a high-voltage neon circuit tester in the room’s outlets.

Safety Alerts!

Never trust an inoperable light switch as a sign that the circuit is off.

Make sure the circuit is truly “dead” before touching any wires or terminals. Check for current again with a high-voltage neon tester before working. Test from the black wires to a grounded metal box or other good ground, then to the white wires. Also, test the white wires to a ground. Also, be sure your tester is functioning by first trying it in a live receptacle.

Circuit Breaker

Step 3: Remove Existing Fixture

Set up a step ladder so that you can reach the existing fixture. Unfasten it by removing its mounting hardware and gently lower it down until you can see the wiring connections. Have an assistant help you hold it if need be. Remove any electrical tape and wire nuts and untwist all of the fixture’s wiring connections. Hand the old fixture off to your assistant or set it aside yourself.

Hanging the chandelier

Step 4: Install New Fixture

Before hanging your new light fixture, read all manufacturer documentation, including installation instructions. Mounting hardware/ installation kits and methods may vary. Generally, however, most chandeliers are hung from a manufacturer-supplied or separately available support bar or brace inside the ceiling.

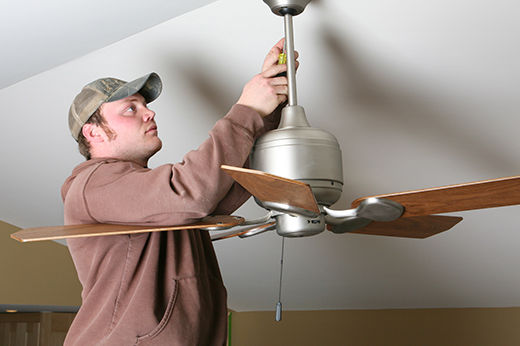
Climb up on your step ladder and remove the existing electrical box and the old fixture’s support bar, if one exists. Support bars expand and retract in order to fit the needed dimensions. Fully retract the new support bar and slip one end of it up through the hole to guide it in, followed by the other end, and then expand it by hand so that it fits snugly between ceiling joists. Use an adjustable wrench to tighten the expansion bolt until the support bar is snugly in place. Be careful — tightening too much can put excessive pressure on the joists and ceiling surface and cause the ceiling drywall to crack. Just tighten it enough so that the support bar is firmly in place. Next, install the electrical box included with the installation kit to the support bar as directed by the manufacturer's instructions. Run the wiring through the assigned holes in the bar and electrical box.

Set up another step ladder for your assistant and then have him or her lift up the chandelier and hold it in place so that you can make the electrical connections. Note: You may need more than one assistant for very heavy light fixtures of 50 to 100 pounds. Your helpers will need to be able to bear the weight of the fixture while you make the wiring connections.

Safety Alert!

Don’t ever have two or more people on a ladder unless the ladder is specifically constructed to handle more than one person at a time.

Attach the house’s black wires to the black wires on the chandelier, white house wires to the white chandelier wires, and the house’s green or copper ground wire to the ground wire on the fixture. Twist the ends of each set of wires together using needle-nose pliers and secure each connection with a wire connector. Further secure the connections by wrapping each of them in electrical tape.

Next, line up the chandelier’s mounting bar with the electrical box/support bar and then install the supplied hardware with the necessary tools, such as a screwdriver (may vary by light fixture). Fold and tuck the wires into the electrical box, and then press the decorative cover plate against the ceiling. Push the chandelier’s retaining collar up the chain and tighten it so that the cover plate is snug. Install the fixture’s light bulbs and shades.

Helpful Tip

Use energy-efficient light bulbs in the chandelier if possible. Consult the manufacturer’s instructions to determine the correct wattage or light type for the fixture.

Step 5: Restore Power

Restore power to the circuit and turn on the switch. You should now have a working chandelier. If the light does not come on, again deactivate power to the circuit and re-check all electrical connections, and then test power once more.

Helpful Tip

Install a dimmer switch so you can control the amount of light to set the desired mood.

Congrats! Enjoy the room’s new ambiance courtesy of your newly installed chandelier.

Project Shopping List

Here’s what you’ll need to complete this project successfully.

test

How to Paint a Ceiling Fan

Refurbish a ceiling fan with a coat of paint with this DIY guide from True Value.

Learn more
test

Top Tips for Easily Fixing a Wobbling Ceiling Fan

If your wobbly fan is causing you a headache, check out our definitive guide on how to balance a ceiling fan. Check out True Value's ceiling fan repair kit.

Learn more
test

How to Change a Light Fixture

Swapping out an old, outdated light fixture adds instant appeal and value to your home, and it isn’t hard to do.

Learn more
test

How to Install a Garage Door Opener

7 Steps - Update your home's curb appeal by learning how to safely install your new garage door by following this DIY guide from True Value.

Learn more
test

How to Install Outdoor Floodlights

Learn how to install floodlights outdoors by choosing the right locations, finding nearby power sources, and connecting power with this 5 step DIY guide.

Learn more