When a plumbing problem pops up, there’s no need to panic — you might not even need a plumber. There are a number of plumbing fixes any D.I.Y-er can accomplish with basic tools and a little know-how. Whether it’s a clogged drain, broken pipe, a leaking toilet or faucet, your local True Value Hardware store has you covered.
Be Prepared
Preparedness is the name of the game. Water damage from broken pipes or leaking appliances can ruin entire rooms of furniture, walls and flooring and more. Routinely check your washing machine hoses and replace them if they appear old or cracked. Look for any signs of water under sinks, around fixtures and near appliances. Check ceilings and walls for any evidence of a roof leak. Make sure that all appliance connections are tight and not leaking.
HELPFUL TIP
Keep items in your basement off of the floor where possible. If a pipe bursts and floods your basement, the damage will be minimized and you won’t lose any belongings.
Make sure you know how to turn off water to your fixtures and appliances when needed. Also, note the location of your home’s main water shutoff valve. It may come in handy if you’re unable to turn off water directly to an appliance or fixture, as shutting off the water main cuts off water to the entire building.
Stock up on basic plumbing tools ahead of time before you have a plumbing emergency. Here’s a list of items you should definitely have in your toolbox for plumbing repairs:
- Pipe wrench
- Adjustable (crescent) wrench
- Basin wrench
- Channel-lock pliers
- Auger (“snake”)
- Hacksaw
- Screwdriver set
- Nut driver or socket wrench
- Plunger
- Drain-cleaning tool
1. How to Get Rid of Clogs
While they can be a minor problem compared to a busted pipe, clogs can be inconvenient and annoying, and should be taken care of when noticed. Don’t wait for the clog to grow and cause more serious problems.
There isn’t one method that always works to eliminate a stubborn clog so you may have to try a few things to resolve the problem.
Start with a plunger. Plungers are easy to use and cost-effective. They are particularly useful for removing food particle clogs in the kitchen sink. A plunger also works on soap, grease and hair clogs in a tub, though often not as well. There is a risk that you will just force the clog further down the drain making it harder to remove.
If the plunger doesn’t work, try one of the many new drain-cleaning tools that are available. The Zip It drain-cleaning tool is designed specifically to unclog sink and tub drains, especially ones caused by hair and soap scum. It’s basically a long, barbed cord made of flexible plastic that is inserted all the way into the drain and then pulled back out. The barbs pull out the hair and gunk that line the inside of the pipes. Drain King® drain openers connect to a garden hose and then are inserted into the clogged drain. The Drain King then uses focused water pressure to force the clog out of the pipe.
If neither a plunger nor one of the drain-cleaning tools work, remove the trap below the sink to search for and remove the clog. You can use a bottlebrush to force any material out of the trap and then clean it well with hot, soapy water.
If the trap was not clogged, then it’s likely that the clog is in the drainpipe and you’ll need to use a snake, also known as an auger, to clear it. You insert the auger and then crank the handle to reach the clog, “spear” it and remove it.
As a last resort, you can use a chemical clog remover. These products are extremely harsh and can damage pipes if used too frequently.
SAFETY ALERT!
Read the manufacturer’s directions thoroughly. Chemical clog removers can irritate skin and not all of them are safe for every type of pipe or drain in a bathtub or sink. They can damage or etch some surfaces and types of pipe. Wear gloves and safety glasses to avoid damage to skin or eyes.
For more detailed information on removing clogs see the project, Drain Maintenance and Repair.
2. How to Repair Pipes
While some pipes can fail because of age and corrosion, pipes break or burst almost exclusively in winter due to water inside them freezing because of frigid temperatures. A burst pipe can be frustrating and messy, no matter the cause, but it’s possible to fix it yourself.
Find out how the pipe was damaged and where it occurred. Open the faucet at the end of the pipe and close the valve that runs into it. Check for holes, cracks or breaks along the pipe. Some pipe repairs are easy. For example, a pinhole can be repaired by simply wrapping the pipe with electrical or duct tape and a hairline crack can be fixed with a pipe clamp.
When using a pipe clamp, first clean the cracked area with a medium- or high-grit sandpaper. Remove any burrs along the crack and then wipe it clean with a rag. Center the clamp over the crack and then tighten the two sides together with the supplied screws until it is a tight fit. Turn water back on and watch for any leaks.
You can use plumber’s putty to patch a leaking pipe union. Turn off water to the pipe either at a valve or at the house’s main shutoff. Clean the area around the leak with a wire brush and then wipe it with a rag. Apply the putty around the leak as recommended by the manufacturer and let it cure for the appointed time. Then restore water back to the pipe and check for further leaks.
For larger holes, breaks or cracks, try repairing them with a patch kit. Start by sanding the area around the break in the pipe with high-grit sandpaper (at least an 80- or 100-grit). Put on rubber gloves and wet the patch, then wrap it around the pipe where it has burst. Start wrapping at the hole and work out from there; wrap at least 4 or 5 inches in both directions. Wrap it as tightly as possible and then press the patch down by hand to ensure a proper bond. Let the patch dry.
For larger cracks that can’t be repaired with a patch kit, you may need to replace that section of pipe. Consider calling in a professional plumber for this kind of repair.
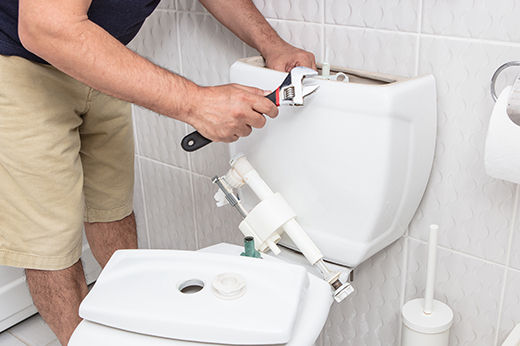
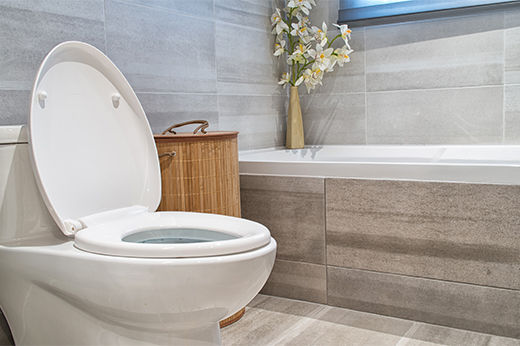
3. How to Fix a Leaking Toilet
If water is leaking from around the base of your toilet, check to see if it may have shifted. Shifting can crack the wax seal and allow water to seep out from underneath. To fix this problem, sit on the toilet and twist it back into position. If this doesn’t stop leakage, you may need to replace the wax ring. Shut off the water to the toilet. If you don’t have an angle stop shut-off valve by your toilet, you need to shut off the water at your home’s main shut-off valve. Flush the toilet several times to remove water from the bowl and tank. Then soak up any remaining water with a mop or sponge. Disconnect the water supply tube.
Next, detach the bowl from the floor. Unscrew the nuts using a wrench. Tilt the bowl forward and rock it from side-to-side. Lift the bowl from the floor. There is less spillage if the bowl is tilted forward. Pry off the old wax seal that is around the pipe on the floor with a putty knife.
Put the new wax or rubber seal around the hole. Place a new wax ring over the drain horn. Apply a bead of plumber’s putty to bottom edge of toilet base.
Turn the bowl back over and position it so the bolts fit through the holes. Twist the bowl a bit to make sure it is in the right place. Press the bowl down to the floor to compress the seal — the best method is to sit on the toilet and rock back and forth. Tighten the nuts on the bolts while you’re seated. Be sure not to over-tighten the bolts or you can crack the porcelain. Make sure the toilet is level. Reconnect the supply tube to the new tank. Open the shut-off valve and let the tank fill with water. Test the toilet by flushing a few times. Put on the toilet seat cover and clean up.
4. How to Repair a Leaky Faucet
First, determine whether the leak is coming from the hot or cold faucet. Also check whether the water is leaking from the tap or the handle. If it is leaking from the tap, you’ll need to replace the washer. If it is leaking from the handle, you’ll need to replace the faucet stem or O-ring. Turn off the water at the shut-off valve located just under the sink. Open the faucet to drain out any remaining water. Close the stopper in the sink bowl and place a towel in the sink to protect against scratches or chips.
Remove the decorative top from the faucet handle. Next unscrew the exposed screw and remove the handle. To remove the stem assembly, turn the locknut counterclockwise with a wrench and lift the stem assembly out. If it sticks, try turning it counterclockwise to loosen the stem. At the bottom of the stem assembly is another screw. Remove it and take off the washer underneath.
Take the washer to your local True Value Hardware store and purchase an exact match to replace it. If the screw looks worn, replace it with an exact match as well. Clean any corrosion off the stem before replacing it. Replace the washer and screw and reinstall the stem. Put the locknut back on and attach the faucet handle. Replace the decorative cap and turn on the water at the shut-off valve. Turn the faucets on, then off and look or listen for any drips.
Alright! Now you’re better prepared for any basic plumbing emergencies that might come your way.