Canned Goods Storage: Making the Most of My Pantry

Canned Goods Storage: Making the Most of My Pantry

We are in the process of upgrading our dated and not-so-functional pantry. The old, rusted wire shelving has been replaced with wooden shelves in a more user-friendly layout. Instead of wrapping the shelving around the entire pantry, we opted to leave the back wall open and create a narrow canned goods shelving system instead.

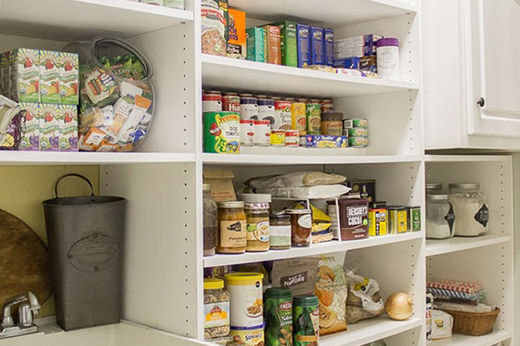
Not only does the shelf hold a ton of cans, it also makes it extremely easy to find exactly what I’m looking for. Another great feature is that it has a very narrow profile – sticking out from the wall only 3.5″! This leaves the entire room feeling bigger and more open and makes finding all our food a piece of cake.

Here is the before to give you a better idea of where we started:

The before closet

Making this shelving unit was fairly easy, especially since it required minimal measuring. I started by measuring my open wall space and figured out how tall and wide I wanted the shelving to be (6′ x 2.5′). Using basic 1×4 whitewood from True Value’s local lumber yard, I cut all my wood: two 6′ boards and fourteen 2.5′ boards. In addition I also cut two 1/2″ x 1″ cleats so I’d be able to screw the shelf to the wall.

I opted to prime all the boards before assembling the shelf to make it easier on me down the line. I gave each board two coats of Zinsser Bulls Eye 1-2-3 primer to block any knots from bleeding through the paint once painted.

To assemble the shelf, I simply attached all four sides with some 2″ wood screws and added the cleats below the top and bottom piece. I pre-drilled each hole with a small bit because whitewood tends to split easier than other woods.

the start of a shelving unit, painting the shelving unit, laying out the frame on the floor

Here is a close-up of the top cleat so you can see how I attached it. I will use this cleat to attach the shelf to the wall by screwing through the cleat into the wall studs.

attaching the cleat to the frame

Now the fun part – figuring out the height of each shelf. I totally cheated and used actual cans of food to determine how tall I wanted each shelf. Each shelf height is unique and holds specific types of cans. If you measure your shelves using canned goods, make sure you set your shelves about 1/2″ higher than the actual cans for some wiggle room above each shelf.

Once the shelves were set, I predrilled holes and screwed all the shelves together making sure to keep each shelf level. Once the shelves were set, I marked my studs on the wall and screwed the top and bottom cleat directly into at least two studs in the wall.

I loaded all my food right away to see how it looked and to test it out. When I finally finish up the pantry and paint everything I will also paint this entire shelving unit using some semi-gloss paint made for trim (trim specific paint is more durable than basic wall paint).

The canned goods used to take up an entire shelf on my actual pantry shelves. They were hard to organize, hard to stack and hard to find. Now I can easily find what I need at a glance.

laying out the shelves using cans, painted shelf, close up of the painted shelf

Not only is the shelving unit extremely functional, it also makes all our canned goods look pretty.

Close up of finished cans

For more DIY ideas and tips check out my blog, House of Hepworths. I’ve got tons of great ideas, tips and tutorials to make your life more organized, easy and functional.

AUTHOR
Allison of House of Hepsworths


Published on Jan 28, 2026
test

Urge to Purge? My 5 Easy Ways to Organize a Pantry

If you’re anything like me, the start of a new year brings the urge to purge. This year cleaning out the closets and organizing the pantry were at the top of my resolutions list. After all of the hustle and bustle of the holidays, my home was starting to reach red alert status on the […]

Learn more
test

How I Made a Rustic Coffee Table in 2 Hours

Hello there! How was your weekend? We had a great one – guess WHAT? Stink Eye Sis got engaged!! 🙂 So excited! So now we have a wedding to plan – how fun is that? We also continued to get some stuff done outside.

Learn more
test

How to Hang Things on Walls With a 3M Claw

Hang Things on Your Walls with the 3M Claw Part of decorating your home or office includes hanging items on the wall. However, using nails or screws can leave unsightly holes or other damage. Fortunately, there are alternative methods available that allow you to hang things without causing damage.

Learn more
test

4 Tips to Make Small Rooms Look Bigger

Learn how to make a small room look bigger with this DIY guide from True Value.

Learn more
test

Storage Ideas for Small Rooms

Check out these storage solutions for small spaces including ideas for your kitchen, bathroom, and bedroom with this DIY guide from True Value.

Learn more