


Hi! I’m Taryn from Design, Dining and Diapers, a blog where I talk about DIY tutorials, home decor, crafts and occasionally a few recipes. I’m so excited to be on the True Value DIY Squad! Are you ready to roll up your sleeves and get started on an easy home improvement project? Today, I’m chatting all about Painting a Concrete Garage Floor.

Considering the garage tends to be the epicenter of most home improvement projects, it tends to take the brunt of things. And after years of oil dripping from cars, paint spills and whatever else lands on that floor, it’s time to give it a little TLC!
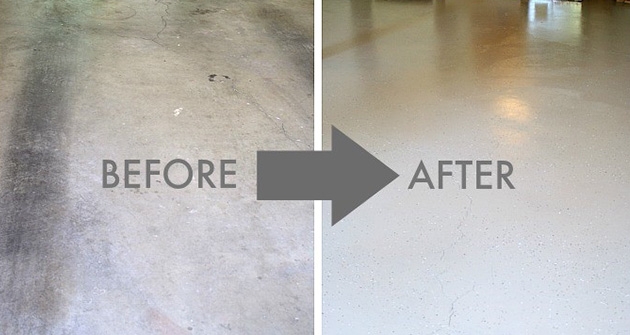
My grandpa built my parent’s home in 1979, and I thought it was about time that THEIR garage floor got a fresh new look! I picked up a Rust-Oleum Epoxyshield Resin Garage Floor Kit (I actually bought two, see below for details) and in just 5 hours my dad and I transformed their garage. This is an easy project that anyone can do!

Here is what their garage looked like before we started. Aside from the obvious tire marks, I’m pretty impressed with how clean my dad has kept their garage floor over the years. I will also note that he had already cleared off the floor the day before we started which saved us lot of time. I highly recommend having the floor cleared and swept before ping into the kit.

Let’s chat supplies.
Here is what you need:
- Rust-Oleum Epoxyshield Resin Garage Floor Kit * (we went with tan)
- Paint Rollers
- 9″ Paint Roller Frame and Extender
- Respiratory Mask
- Scrub Brush
- Garden Hose
- Scotch Blue Painter’s Tape, Exterior
- Squeegee Floor Brush
- Small Paint Brushes
Other helpful supplies:
* The Rust-Oleum Epoxyshield Resin Garage Floor Kit includes everything you need for the process except for the items mentioned above. It says one kit covers 250 square feet but we ended up running out of paint right at the end and needed to open another kit just for the paint. The kit comes in several different colors and since we chose the lighter color we had to apply a thicker layer for complete coverage.
Step 1: Clear and Clean Your Floor

The cleaning process is very vigorous. It is actually the most time consuming part of the entire process. It was helpful to have the garage cleared and initially swept before we started but so much more goes into it. I used a putty knife to remove thicker build up and most spots just lifted right up.
Step 2: Apply a Degreaser

It’s really important to remove all grease stains in order to help the paint adhere to the floor. We poured a basic heavy duty degreaser over all the tire marks and other oils stains and everything came right up using a scrub brush. Rinse thoroughly before moving to the next step.

Just look at the difference.
Step 3: Clean With Included Concrete Etch Mix

It’s time to break open that kit! The Rust-Oleum Epoxyshield Resin Garage Floor Kit includes an instructional DVD if you want to take a look at that for additional info too! First, take out the Concrete Etch Mix and mix it with 2 gallons of water. They suggest using a watering can so it’s easy to pour onto the floor. I used a smaller watering can and pided the mix into 4 equal parts. Mix thoroughly.

Working in a 10X10 section, wet the floor, pour the Etch Mix over, scrub and then rinse. You’ll want to rinse each area two times. This gets the floor unbelievably clean!
Step 4: Allow Concrete to Dry and Tape

The day we did this project it was a hot summer day, and the garage floor took only about an hour to dry. You may also want to set up fans to help the process. We chose to tape the edges of the garage to prevent any paint from getting onto the walls or pieces we left in the garage. ScotchBlue Exterior Tape is perfect for this step.
Step 5: Time to Paint

Pour Part A into Part B and mix for 3 minutes.

I used a small brush to go around the edges first and then we used rollers. The edging was a little more time consuming, but once we moved out to the center of the garage it took no time at all.
Because we used a lighter paint color we did notice some roller marks after the first few sections began to dry. So we ended up letting each 4X4 section dry for a few minutes and then went over it with a thicker second coat. This is probably one of the reasons why we needed two kits.*My dad decided to leave his fridges in the garage and we painted around them. In the event that he decides to remove them one day we can always touch up the areas.

Now here’s the fun part, sprinkle time! Be sure to paint a 4X4 section and then sprinkle immediately while the paint is wet. My Father-in-Law actually used this kit on his garage too and let me in on a little secret. He filled an empty spice container with the sprinkles and then shook them over each section of the floor. This helps get an even look over the floor and helps with the mess! You can use as much or as little as you want. We used only 1/2 the container on the full floor.

And this is when we ran out of paint! SOOOO close to the end. I think my dad’s garage is a little over 250 and we used thicker coats which is why we ran out. So we opened up a new kit.
Step 6: Wait 12-24 Hours for Dry Time

The kit says the floor will be ready for light foot traffic 12-18 hours after application. However, at 24 hours there were still some areas that seemed a little sticky. Just be cautious.

Wow what a difference! Depending on how big your garage is and what supplies you already have on hand, the project will run you anywhere from $75-$200.