


Whether you’re trying to extend your growing season or simply want to enjoy gardening with your children when it’s not seasonal enough to work outside, creating and maintaining a simple indoor greenhouse is a fun DIY activity for the whole family to enjoy all year-round. Keep reading to learn how to make a mini greenhouse of your own.
-
Step 1: Plan It Out
Before you start your greenhouse project, you should plan out exactly what you need. Decide on what type of plants you want to grow and what you want to do with them in the long run. Keep in mind how much space you have to work with as well. A corner of your basement, garage or a spare room is about all you need to create an indoor gardening oasis and there are a number of ways to craft one. Do what works best for your family and what might be easiest for your kids to tend.
For this project, we will focus on creating a small indoor greenhouse that consists of shelving and lighting with a variety of planters or pots. Don’t worry about placing the greenhouse near a window or other natural light; there is no need, as you’ll be using electrical fluorescent lighting or grow lights. Make sure your greenhouse location will be close enough to an electrical outlet so that you can plug in a power strip for your lights.
Keep in mind what type of plants will thrive in this environment. A handful of plants that do well in greenhouses are ferns, gladiolas, orchids or begonias. Ask an employee at your local True Value hardware store for more suggestions or for any other tips and suggestions.
-
Step 2: Install Shelving and Lighting
Purchase a simple household shelving unit that has three or four tiers. Assemble the unit, following all manufacturer instructions. You will also need a power strip or two, depending on how many lights you will install. Use shop lights (with hanging chains) that can be fastened to the shelving so that the light shines down directly onto the shelf tier below. You can also use actual grow lights, but these are often more expensive.
Keep the power strips out of the way by using cable ties to attach them to the middle shelf, near the back. This location will make it easy to plug in all power cords for your lights. Assemble your shop lights, following all manufacturer instructions. Use the shop lights’ chains and hooks to attach them to the underside of each tier. If you want to use the top shelf for planters, you will need to hang one of the lights from the ceiling or a similar structure above that tier. Plug shop lights into the power strips.
Helpful Tip
Use a light timer to set when you want the lights to activate and turn off during the day. This will allow you to control the amount of light the plants get as well as conserve energy when light isn’t needed, saving you from having to actively turn on or turn off the lights yourself.
Turn on the power strips and check that all lights are working.
-
Step 3: Turn on the power strips and check that all lights are working.
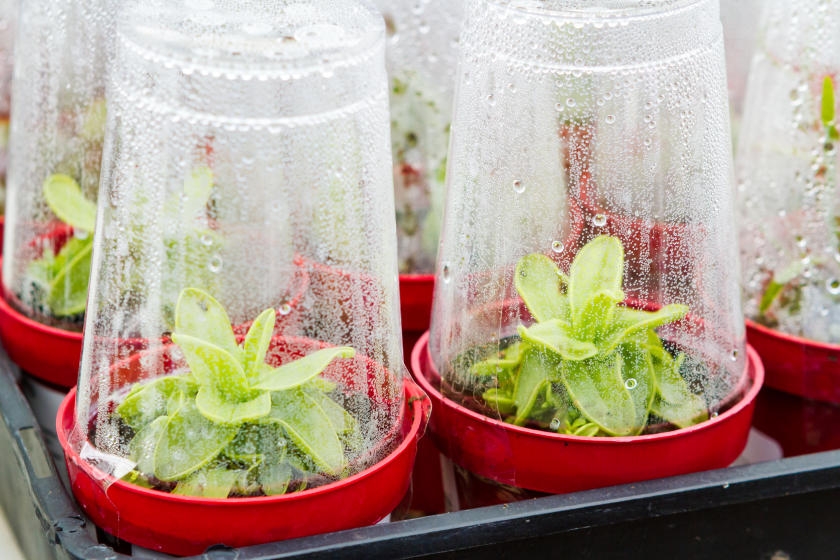
This is where some creativity can come in handy. It is also a fun part for kids. You don’t have to use traditional pots or planters. There are many items that can be repurposed into planters and provide a fun crafting experience for you and the kids. You can repurpose an aquarium and make a sort of terrarium planter. Even small plastic drinking cups can be decent planters for very small plantings.
One cheap way to create “pots” is to reuse 2-liter soda bottles. This is also another great way to “recycle” some plastic containers. Measure about 6” from the bottom of the bottle and mark this spot with a marker. Then cut the bottle in half at that location with a utility knife.
Safety Alerts!
When doing this project with your kids, make sure that you cut the bottle yourself, unless you feel your child is ready to handle something as sharp as a utility knife. Use your discretion and supervise them.
Remember that the bottle edges may be sharp after you’ve cut the bottle. Make sure your kids are aware.
Regular planters or pots work as well. No matter that type of planter you want to use, they all work in the same way. Remember to choose a planter based on how much room a particular plant’s roots need. Fill the planters or pots with 1” of sand or gravel for drainage and then fill them with potting soil up to about 1” from the top.
-
Step 4: Start Planting
You can either start your plants from seed or by planting plants with roots. Follow the directions on the packets and add the seeds to the depth specified by the manufacturer. Mist the soil with water, keeping the soil damp but avoiding over-watering. You may have to mist the plants every day, especially if your home is especially dry during the winter months.
Helpful Tip
When purchasing seeds, make sure you choose compact varieties. The regular varieties are meant for growing in large spaces and can be difficult to grow indoors.
For rooted plants, take the plant out of the pot it was in when you bought it and gently shake off the old potting soil or mix from the root ball. If the roots are tightly wound, gently slice the sides of the root ball in two or three places. Fill 1/3 of a new container with potting soil and insert the plant stem or root ball. Fill in around the sides of the root ball with more potting soil, pressing lightly. The plant should be at the same soil level as it was originally growing and there should be a 1/2” to 1” space from the top of the mix to the lip of the pot.
Helpful Tip
When selecting potting soil, choose a mix that specifically identifies what it’s made of. Avoid bags that just say “peat” or “compost.” Instead, look for potting soil with specific ingredients, like “sphagnum peat moss.” This potting soil will be higher quality and better for your plant.
When you’re done potting your plants, organize the containers on your shelving, keeping in mind which plants need the most light. Ask an employee at your local True Value hardware store for advice.
Water your plants, thoroughly soaking the potting mix. Then allow it to drain. To ensure that your plants grow healthy and strong, feed them immediately after repotting and on a regular basis thereafter. Be careful not to use too much fertilizer; follow package instructions carefully. Use a liquid plant food such as Miracle-Gro® Liquid All-Purpose Plant Food, available at your local True Value hardware store.
-
Step 5: Cover It
If your greenhouse location is in a very warm, humid part of your home, your indoor greenhouse may not need covering, but you can cover your greenhouse with plastic sheeting to keep in warmth and moisture just like a full-size greenhouse. Deciding on whether or not to cover it can be determined by trial and error. Just keep a close eye on your indoor greenhouse to determine what works best for you and your plants. Sheeting can be held in place by using tape or by gently tucking the excess behind the shelving.
Alright! Now you and your kids have an indoor greenhouse. Let the good times grow!
Project Shopping List
Here’s what you’ll need to complete this project successfully.
- Shelving system
- Power strips
- Shop lights
- Plastic cable ties (if needed)
- Light timer
- Aquarium (optional)
- Plastic drinking cups (optional)
- Marker
- Utility knife (optional)
- Plant containers or pots
- Sand or gravel
- Potting soil
- Seeds
- Spray bottle
- Miracle-Gro Liquid All-Purpose Plant Food Concentrate
- Plastic sheeting
- Tape
