


It’s summertime, and you know what that means: we’re spending a lot more time outside grilling and just relaxing on our porches and decks. When summer arrived this year, I took a good, hard look at my screened porch and decks and realized they were all badly in need of some freshening up. We had many days of heavy rains at the end of summer last year that, along with all the trees that extend over my decks, turned the decks a nice shade of green/brown. Yuck.
Normally when just the deck floor needs cleaning, I will clean it myself like I did last year when the front porch needed a good cleaning.

For that job I used a pressure washer purchased from True Value.

It came out looking great! (You can read more about this DIY project here: Goodbye Mildew and Mold, Hello Shiny Clean Porch.)

Since the screened-in porch is two stories up, I hired a professional company this time to handle the cleaning of the porch, decks and the pergola just barely visible in the photo below.

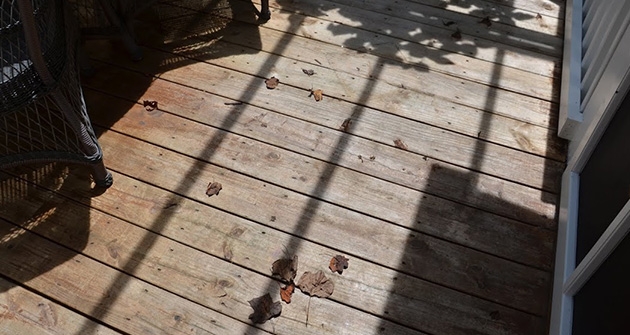
Here’s how the deck that’s located under the pergola looked after everything had been professionally pressure-washed.

When I’ve had the decks cleaned or pressure-washed in the past, I’ve always found it necessary to stain them again afterwards. The decks are usually so dirty from the heavy rains, leaves and other debris that falls from the trees, the cleaning process ends up removing a lot of the stain from the deck as you can see in the picture below.

When I stain the decks, I normally use a semi-transparent water-based stain. This year I decided to try something different.

I decided to go with an oil-based product this time around (here is a similar option). I recently learned that oil-based stains are often recommended for decks because they penetrate the wood and hold up well to harsh conditions better than water-based deck stains. We don’t get a lot of snow here, but I’m hoping an oil-based stain will fare better when the decks need cleaning again.

I love staining my decks. I’ve done it a couple of times now, and it’s so rewarding to see the results develop as you go. It’s a little like painting a room, you get that instant gratification!
I moved some of the deck chairs inside onto the porch to prepare the deck for staining.

Since I didn’t have anyone to help me move the table off the deck, I pushed it over to one side. This is normally the way I go about staining my decks. I move all the planters and furniture over to one side, stain half the deck, let it dry, then move the furniture onto the finished section and finish the process. The important thing to remember is to not stain yourself right out of your home or worse, into a corner. Just think it through and plan where you’ll end up. If you’ll end up at the foot of the deck stairs, make sure another door to your home is unlocked or you may have some unintended alone time in the back yard. Plan ahead for your exit!

When staining your deck, you’ll need a few tools to get the job done in the quickest and most efficient manner. Most stains will indicate on the can that they can be applied with a roller. I prefer to apply deck stain with a brush. I’ve personally found it does a much better job. When using a brush, you can get down in-between the boards, at least part way. That gives the decking much better protection. If you have a bad back, by all means go with the roller, but if possible apply your stain with a “deck and siding” brush like the one shown below. Deck and siding brushes are thick and wide, which makes the staining process go quickly. Since I decided to go with an oil-based stain this time, I purchased a brush comb (visible to the right of the brush) to help clean the brush in a solvent, once finished.
I also recommend a handy little pail like the one shown here. You don’t want to have a whole can of stain open on the deck exposing it to the air while you work, plus it would be way too heavy to lug around. These small little pails are great for painting or staining because they have a handle through which you can slip your hand, making it easy to hold onto the container as you work. Or just place it on the deck and move it along as you work. I also like to use a liner like those shown to the left of the pail. They make clean-up a breeze.

You’ll also need a smaller brush for getting into corners and under the decks rails and stairs where a roller or larger brush can’t reach. I personally prefer an angled brush since they’re great for tight corners.

Normally I don’t wear gloves while painting, but since I knew I’d be using an oil-based product this time, I decided gloves would be a good idea. Oil-based stains and paints are very durable, including on your skin! So buy some inexpensive disposable gloves, and you won’t have the sticky-hand-syndrome (and smell) to contend with afterwards.
Before I began the staining process, I used the brush you see below to do a little last-minute cleaning.

When the crew was here pressure washing, they had moved my planters around and the planters left a few spots here and there. I also had some spots where my hibiscus trees had dropped their old flower blossoms. When they do that, the flowers always stick to the deck flooring. Do your hibiscus plants make a mess on your decks too?
Using water and a brush, I scrubbed away any spots before I got busy staining. I also gave the deck a good sweep to remove any leaves that had fallen since it had been cleaned. I let the spots I cleaned with water dry well because a deck needs to be totally dry before applying a stain, especially an oil-based stain.

When staining a deck, it’s best to not do it on a day when it’s extremely hot out, as you can’t properly apply stain to a deck that’s scorching hot. That may mean you’ll need to apply your stain during the morning hours before the deck heats up, or later in the day when the sun is on the other side of your home. This deck is on the southeast side of my home and never gets really hot due to the tree canopy overhead. It’s a completely different story for my other deck that gets the brunt of the sun in the late afternoon.
I started on one side of the deck and worked my way across, stopping about half way over. The photo below was taken early on in the staining process and you can see the area closest to the house was already beginning to dry. Once half the deck was finished and had totally dried, I moved the furniture over to the dry part and finished the staining process.
One nice things about staining a deck is it’s easy to stop if you need to take a break, unlike when you’re painting a wall. The separation between each of the deck boards gives you lots of stopping points. Of course, you don’t want to stop in the middle of a board, but it’s fine to stop between boards.
If you stop for a break, don’t forget to wrap your brush up in plastic wrap to keep it from drying out. I always wrap my brush in plastic wrap, then place aluminum foil around that. It works great and keeps the brush from drying out.

In the past I’ve always stained my deck a medium brown color, shying away from any of the reddish-colored stains. I decided to go with a stain that had a little red in it this time, thinking that would look good with the copper-toned, solar caps on the posts.
This photo was taken after the staining was completed with the larger brush. I still needed to touch up underneath the deck rails. I have found for my deck, it’s better to do all the staining with the larger brush first, then go back the following day with the smaller brush to touch up the corners around the bay window and underneath the decks rails. If your bottom deck rail is higher up off the deck, you may be able to reach underneath with the larger deck brush. My bottom rail is really low so it’s takes a smaller brush to get underneath.

This deck has stairs that go down to a landing, then turn and continue down to the yard.

Here’s how they looked once stained. When I stained the steps, I started at the top and worked my way down, that seemed to be the easiest way to tackle those.

And here’s the deck the following day after the touch-up staining was done under the rails.
This deck is done…time to tackle the one on the other side of the porch. I’ll follow the same process when I stain it, too. So satisfying to see the results when it’s all finished. Is your deck in need of a little freshening up? I’m really looking forward to seeing how the oil-based stain works over this next year!
