


Hello there! How was your weekend? We had a great one – guess WHAT? Stink Eye Sis got engaged!!  So excited! So now we have a wedding to plan – how fun is that? We also continued to get some stuff done outside. Make that ME – hubby was out of town and I sweated out a third of my body weight (I WISH) and worked on some outdoor projects. Funny that the temps have “dropped” into the 80’s and are a bit more bearable, but that coincided with humidity out the wazoo.
Intense.
Anyhoo.
We had a set of tables on our deck that I wanted to change up this weekend:

They’re actually ottomans that came with our furniture. They had cushions on top, but those fell apart (hmmmm…mental note that cushions don’t like snow).
Sooo…we had the bases and I thought they made a great coffee table set up. But when I got it all in place, there was just too much metal going on, you know? Metal coffee table, metal chairs with legs, metal side tables…with legs.
You see what I’m saying.
So I wanted to add a different texture and warm it up a bit. My DIY trough gave me an idea:

I took a trip out to my True Value’s lumber yard (I go to the one in Pendleton Indiana, and LOVE it) to get some more cedar wood.
I got some ten foot boards and a couple eight foot furring strips (which are just unfinished strips that I sometimes use as a base to projects). I thought a bit about how I was going to do this and then decided to start with the tables upside down:

The dog must remind you that he’s here every chance he gets. 
I realized when I got home that the wood I picked up was pine, not cedar. I know what pine looks like and I know what cedar looks like, so I have no idea what I was doing. Cedar would be my ideal choice for outside, but there’s no way I was driving back.
The table doesn’t get any direct sun or rain, so it should hold up just fine. (I say that while crossing my fingers.)
I cut the furring strips to make a base around the table:

I just screwed them in at the ends to connect them – not into the metal table. I made it tight, but later realized it may have been too tight. I could have given it a little more wiggle room.
When screwing into wood, especially thin wood, and especially soft wood like pine, you always want to use a drill bit to prep for the screw:

Otherwise you risk splitting the wood. I used outdoor wood screws, and I still used my drill bit. Sometimes you can get away with it, until that time you don’t and it ruins a piece of wood. Ask me how I know.
Once my frame was done, it looked like this:

I knew I wanted a “skirt” around the table, so I used the 1 by 4 pine boards to surround the furring strips:

I installed them the same way – into the ends (like furring strips above) and then into the furring strips as well:

I put boards on top so I could see the thickness I needed to make the top flush, then installed the skirt. Does that make sense?
I did that so I could lay the top boards on and they would be flush with the frame:

Before I even started, I made sure that the pine boards would fit in perfectly, without having to cut down one of the boards. (I don’t have a table saw.)
The area inside the frame was a little over 28 inches, so I knew I could fit seven four inch boards inside, and still have a little breathing room in between.
If it wasn’t going to fit perfectly, I was just going to lay the boards across the top so instead of inside the skirt. I hope that makes sense!!
Then it was onto the fun part. The part where our neighbors were hating us. We grabbed our tools:

And beat it up! Whoo! It’s good fun folks. I wanted it to look rustic and old and these did a pretty good job.
Then I gave it a decent sanding:

“Decent” means lightly swipe it over the wood as quickly as possible because I HATE SANDING with a burning passion.
Then I used my favorite stain and applied it with a foam brush:

You swipe it on, get it into the wood, then wipe it off. I was planning on doing more than one coat but I actually liked the look just after one:

I want it to have a bit of a contrast off the dark metal legs, so I think I’m sticking with one.
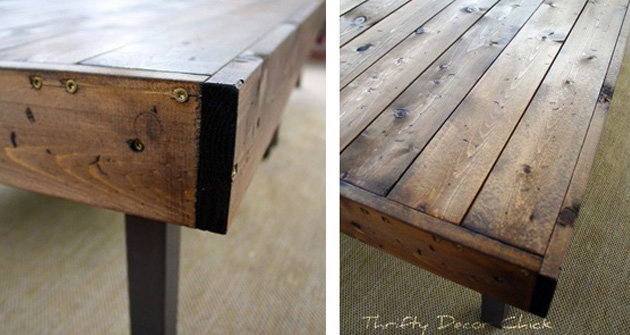
Like all of my projects, it’s not perfect! There are spots that don’t meet up perfectly, you can see the screws and the rough edges of the wood are showing:

But this time, it was all on purpose. I didn’t want it perfect – since it’s outside, the more rustic the better. That’s my story and I’m sticking to it.
You can see above how I screwed the top boards into the “skirt” – now it’s all one piece. The long boards across the top lay directly on the table so they don’t move around at all.
I will finish this up with a coat or two of polyurethane, to protect it. I had hoped to get that done and style it all pretty for ya, but the clouds opened up and poured on us tonight, so this post is a bit anticlimactic.
I do love love LOVE how it turned out though – just like in my head!:

It’s going to look SO good with candles and plants and that good stuff. And I won’t care if it gets beat up or something falls on it or whatever…it will add to the patina.
After a couple hours and $20 in wood, I changed up the look completely – gotta love that! And when winter hits we can take the top off and put it in the garage.
I hope to show you the deck soon – we still have to stain it though. This is the most dreaded project of ALL TIME people. Oh my dear. I’m so loving the space to much though, I can’t wait to show you. I’m determined to get it done soon.
This week hopefully. GoodNESS, it’s going to take FOREVER.
You busy this week?
I was one of the bloggers selected by True Value to work on the DIY Squad. I have been compensated for my time commitment to the program as well as my writing about my experience. I have also been compensated for the materials needed for my DIY project. However, my opinions are entirely my own and I have not been paid to publish positive comments.
