Thinking about redecorating or modernizing your kitchen or bath? A brand new faucet adds instant pizzazz to the two most popular rooms in your home. If it’s been a while since you replaced your faucets, you’re in for a pleasant surprise — today’s versions are more durable and trouble-free than their predecessors, and their washerless design means fewer leaks and repairs.
Here’s another pleasant surprise — installing a new faucet and a kitchen sink sprayer are simple enough for even beginning do-it-yourselfers to handle.
Replace an Old Faucet
When selecting your new faucet, be sure it will work with the existing faucet drillings. Most likely, the drillings for your current faucet are either center set, widespread or single-hole. If your faucet currently has a spout and two handles for hot and cold water together on a shared base, you have a center-set faucet (note that there will be three holes underneath the faucet). Widespread faucets will have a spout and separate hot and cold-water valves, each with their own base. Single-hole faucets have a single spout and handle in one base.
Plan so that the color and style of your new faucet matches your décor, accessories and countertop in your kitchen or bathroom. There are a number of colors available. Popular choices are in various finishes of chrome, nickel, and stainless steel, among others.
Helpful Tip
Match your new faucet color and style with the new hardware you also will be installing (See: Replace Hardware). Shop for both at the same time for a perfect match.
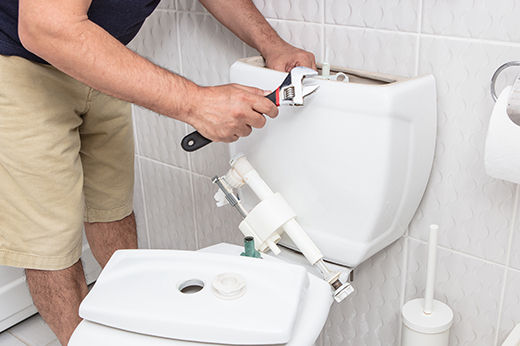
Step 1: Remove Existing Faucet
- Before you begin, shut off water to the fixture by turning the water valves for both hot and cold water located under the sink.
- Turn on the faucet to drain any remaining water in the lines.
- Use an adjustable wrench to disconnect the water supply lines.
- Spray the faucet tailpiece, mounting nuts and coupling nuts with WD-40® spray lubricant to loosen them up if they are hard to turn. Detach the coupling nuts first with a basin wrench or channel-type pliers.
- Next, unscrew the tailpiece mounting nuts and remove the faucet base from the sink.
- Clean the now exposed surface underneath with mild detergent, a rag, brush or sponge, depending on how dirty it is.
- If stubborn plumber’s putty remains, scrape it away with a putty knife or gently with a razor blade.
Helpful Tip
Place a small bucket or pot in the under-sink cabinet to catch any water that might spill while you’re disconnecting water lines.
Step 2: Insert New Faucet
- Insert the new faucet into the empty opening where the old faucet sat.
- Caulk the base of the faucet with either silicone caulk or plumber’s putty, applying a bead about 1/4″ thick.
- Move the faucet into position, being sure that the base is parallel to the back of the sink.
- Now press the faucet down firmly so that it’s tightly sealed to the sink.
- Scrape away any excess caulk from the surface of the faucet.
- Let the putty set.
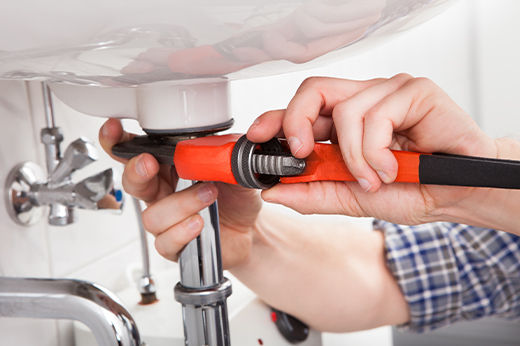
Step 3: Make Connections
- Use your basin wrench or channel-type pliers to connect the metal friction washers to the tailpiece underneath the sink. Then attach the mounting nuts.
- Attach the supply tubes to the tailpiece, and then use your basin wrench or channel-type pliers to tighten the coupling nuts.
Step 4: Reconnect Water Supply
- Now that the supply tubing is attached to the sink, connect it to the water source at the shutoff valves using compression fittings.
- Tighten the mounting nuts, first by hand and then with an adjustable wrench, turning them 1/4 of a turn to make sure they’re not too tight.
Helpful Tip
When you’re tightening the supply tubing to the valve, hold the valve with another wrench to keep it from turning.
If your new faucet has pre-attached tubing, it is not necessary to connect tubing to the faucet. Connect the pre-attached supply tubes to the shutoff valves with a basin wrench or channel-type pliers. The tubing with a red label connects to the hot water source and the tubing with a blue label connects to the cold water source.
Step 5: Attach a Kitchen Sink Sprayer (Optional)
If you’re replacing a kitchen faucet and an old sprayer, follow these guidelines.
- Apply a 1/4″ thick bead of either silicone caulk or plumber’s putty to the bottom edge of the sprayer’s base.
- Insert the end of the sprayer hose into the sink opening and press the sprayer firmly into place.
- Scrape away any excess sealant and let the base and sealant set for a few minutes.
- Place a washer over the tailpiece, then screw in and tighten the mounting with a basin wrench or channel-type pliers.
- Scrape away any extra putty from the base of the sprayer.
- Connect the hose to the hose nipple found on the bottom of the faucet. Use your basin wrench or channel-type pliers to tighten the screw a 1/4 of a turn (remember, not too tight).
That’s it! Your new faucet now makes your kitchen or bathroom look brand new too.