


There is nothing better than an easy update that can instantly change the entire look of a room – it’s called the power of paint. While changing a color can significantly transform a room, going one step further and adding stripes to your walls can create some sophisticated interest as well.
Stripes are a clean, crisp and simple way to add dimension and personality to any room. Horizontal stripes tend to make a room appear more spacious while vertical stripes can make a ceiling appear taller. Whether horizontal or vertical, the painting technique is basically the same with unlimited possibilities for creativity.

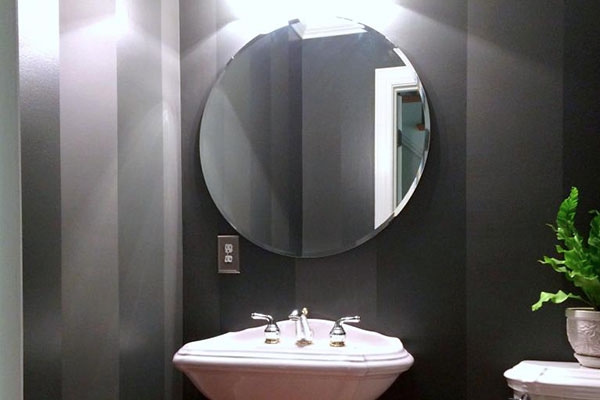
I love the impact of using stripes in smaller spaces and have used them previously in my powder room. I’m a big fan of tone on tone painting. Using the same color in different sheens creates a subtle, subdued pattern. While the lighter grey was calming and relaxing, I decided to give the room a more dramatic feel with some deep rich color.

True Value EasyCare Tuxedo (color D407) was used to transform this room. The stripes were created alternating the blackened-green Tuxedo color – in a flat and satin sheen. Below are some helpful how-to’s to create the same do-it-yourself effect.

Preparing the Walls
Prepare the Room by removing any wall hangings, including the light switch covers, electrical outlet plates and vent covers, as well as any furnishings and accessories in the space.
Prior to painting, cleaning and prepping the walls are important steps to ensure the paint adheres correctly.
Wipe down all of the walls and trim with a sponge using mild detergent and water.Once the walls have dried, repair any holes or damage to the drywall using a spackling compound and putty knife.
If the trim and ceiling need a fresh coat of paint – now would be a great time to paint those as well.

Depending on the damage, the compound may take up to a day to completely dry for sanding – so be sure to add that into the plans.

Painting the Base Coat
The first coat of paint is going to be the base coat. This color should be the lighter of the two colors chosen for the stripes. If you have decided to use the same color for both of the stripes, use the flat sheen for the base coat.
Recommended Supplies:
- EasyCare Ultra Premium Interior Paint – one coat coverage & low VOC
- Wooster 2 1/2 inch Ultra Pro Angle Sash Paintbrush – great cut-in control
- Roller Frame & Roller Covers – be sure the nap size of the roller corresponds with the texture of the wall’s surface
- Paint Tray & Liner – for easy cleanup
- Dropcloth

The base coat will be applied to all of the walls.
Let the base coat dry overnight – especially since painters tape will be used during the next step of the process.

Measuring and Marking the Stripes
Once the base coat is completely dry it’s time to layout the stripe pattern. Determine the orientation of the stripes and how wide you would like the stripes to be.
Recommended Supplies:
- Painter’s Tape – since we are working on a freshly painted wall Frog Tape delicate surface works fantastic.
- Level
- Pencil or Chalk Line
- Tape Measure

Begin in an inconspicuous corner, like behind the door, and measure the entire wall. pide the wall measurement by the width you would like your stripes to be.
For a more cohesive look, an odd number of stripes should be used on each wall. This will also ensure the corners of each wall will be the same color.
Using a tape measure, measure off the intervals for the stripes and mark the top and bottom of the wall lightly with a pencil.
Next use the straight edge of a level to connect the top and bottom guidelines – creating the vertical stripes.

Once the guidelines are drawn, decide which stripes will be painted and tape accordingly.

Remember only every other stripe will need to be masked off. This means only the outside edges of every other vertical stripe needs to be taped.
As a reminder, it’s a good idea to tack a piece of tape on the stripes that will not be painted – as shown above.

Painting the Stripes
Using the second paint color, paint over the marked areas.
Recommended Supplies:
- EasyCare Ultra Premium Interior Paint – one coat coverage & low VOC
- Wooster 2 1/2 inch Ultra Pro Angle Sash Paintbrush – great cut-in control
- Roller Frame & Roller Covers – be sure the nap size of the roller corresponds with the texture of the wall’s surface
- Paint Tray & Liner – for easy cleanup

Once the entire masked area is painted, remove the tape. Angle the tape away from the fresh paint as it is being pulled. The paint does not have to be completely dry before the tape is removed.


Happy Painting!