


A flooded basement is one of the most frustrating problems a homeowner can face. Because basements are below ground, water can often infiltrate the space after a heavy rain and cause thousands of dollars’ worth of damage, not to mention the mess and potential loss of valuables.
Installing a sump pump is the best way to make sure any water that floods into your basement can be removed and pumped outside to avoid costly damage. While professionals are often employed to install these devices, it is definitely something a do-it-yourselfer can accomplish.
Why Use a Sump Pump?
When gutters fail to direct water away from your home’s foundation and/or your landscape isn’t graded away from the foundation, groundwater that has nowhere else to go will end up inside your basement, if it can find a way in. Fixing any basement leaks is your next defense (see Repair Basement Leaks). However, you usually don’t know if you have leaks until they happen.
A sump pump is your last line of defense against flooding. If your house is on a flat lot or in a low-lying area (below the natural water table) a sump pump is ideal for your home. Even if you think your home is properly sealed, water can sometimes find a way in under a door or other opening you wouldn’t expect. Sump pumps remove water from inside your home and discharge it away from the foundation so that it doesn’t leak back in.
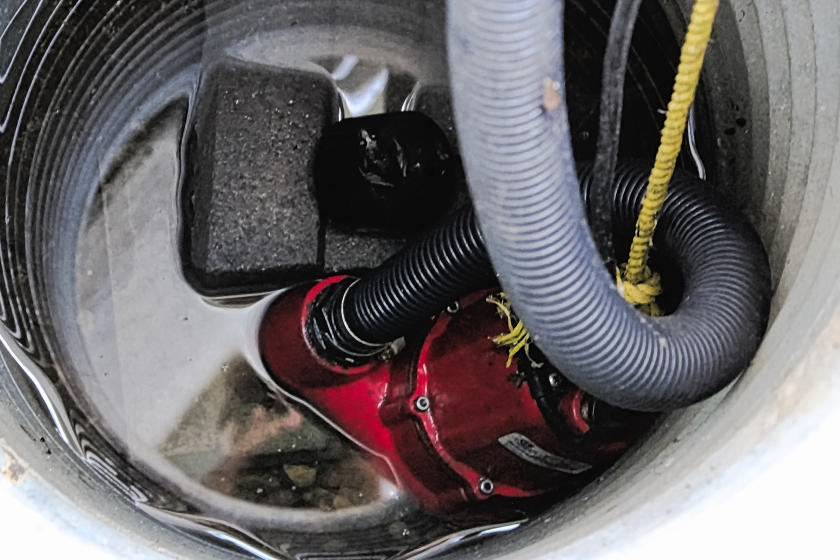
There are two basic types of sump pumps: pedestal (above a sump basin) and submersible, which sits inside the sump basin where excess water collects. Sump pump components include a plastic or metal sump basin liner; a pump (1/3 or 1/2 horsepower; 200W or 400W, powered by electricity); PVC discharge pipes routed from the pump to outside the house; and a check valve that keeps water from flowing back into the basement when the pump is deactivated. It is also common to install a battery-operated backup pump that can be activated if a power failure occurs during a heavy storm. An expert at your local True Value hardware store can help you find the right model and answer any questions you may have.
How to Install a Sump Pump
Step 1: Determine Pump Location
Ideally, your sump pump basin should be in the lowest-lying location in your basement so water will naturally flow there. Go by sight as much as you can and then use a level to be sure the area is sloped downward. If possible, this spot should also be near an outside wall for easier placement of discharge pipes and close to a GFCI electrical outlet so that you can plug in the pump. Also, check that this location will accommodate installation of the pump’s discharge pipes so that they remove water to a spot away from the foundation or preferably into a nearby drain, if local codes allow you to do so.
Safety Alerts!
Check with your local municipality about any applicable codes or regulations for this project and check to see if you need a permit to do the work.
Find out where sewer pipes and other utility lines are located if they run under your foundation. You will be breaking up the concrete in the basement and digging into the ground underneath; you don’t want to break any pipes and cause a bigger, and potentially dangerous problem.
Step 2: Break Ground
To measure out the size of the hole you will make, place the sump pump basin liner on the floor and trace around it using a permanent marker. Rent a jackhammer to break up the concrete floor inside the circle. Make holes with the jackhammer every couple of inches around the marked circle and use a large sledgehammer or a small sledge with a masonry chisel to further break up the concrete into small enough pieces that they can be easily picked up and disposed of. Keep some kind of large container, such as a heavy-duty trashcan, to cart away the broken-up concrete.
Safety Alerts!
Wear heavy boots and safety glasses when operating a jackhammer.
Be sure you know how to safely and effectively operate a jackhammer. Follow all instructions for its use carefully.
If a jackhammer is unavailable, you can also try using a sledgehammer (as carefully as possible) to start the hole by breaking up the floor, and then a small sledge with a masonry chisel, or use a high-powered hammer drill with a large-sized masonry bit to make more precise cuts and to finish the work.
Using a pointed shovel, dig out the soil beneath the concrete to a depth of 2′ or 3′ and dispose of it. You want the top of the basin liner to fit flush at floor level when the job is complete, so be sure to match your digging depth as close as possible to the basin liner’s dimensions. Add a small amount of gravel at the bottom of the hole, place the liner in the hole, and then use gravel to fill gaps around the liner to ensure a proper fit in the hole. This will also ensure good drainage. In the end, you want the top of the liner flush with the basement floor (top of the hole) with about 6″ of space between the top of the hole and the gravel you added around the liner.
Mix and prepare a small batch of concrete according to manufacturer’s instructions, and pour it onto the gravel layer in the basin until the space between the gravel and the basement floor has been filled. Smooth the concrete down with a trowel to make sure that the top of the basin and the surrounding floor is even and level. Let the concrete dry completely (check package directions for required dry times).
Step 3: Install Discharge Pipe
While the concrete around your sump basin is setting, it’s a good time to make an opening for your discharge piping. Check your particular sump pump model’s instructions to find out what size of PVC pipe you will need to use for discharging the water outside. It will most likely be 1-1/2″ pipe. Use a power drill to make a 1/4″ starter hole above the foundation through the rim joist and the outside wall. Using the starter hole as a guide, use a hole saw with your drill to make the final hole with a bit size appropriate for the size of your discharge pipe, as recommended by the pump’s instructions.
Slide a section of PVC pipe through the hole to the outside. Keep enough pipe length from the rim joist on the inside to be able to attach an elbow joint that will eventually connect to a pipe leading from the pump. Connect the elbow joint to the discharge pipe with PVC cement. On the outside, trim the discharge pipe to an inch or two with a hacksaw (just enough so you can attach another elbow joint here for additional piping away from the foundation, if needed), preferably to a nearby drain, if it’s feasible. Seal around the pipe on both the inside and outside with silicone caulk so that it is air- and water-tight.
How you connect additional pipe to the discharge pipe outside depends on the particulars of your property’s topography and landscaping features. Essentially, you want to discharge water so that it flows away from your foundation. You don’t necessarily need to install additional pipe; putting in a splash block underneath the discharge pipe is a simple way to direct water away from your home. Just be sure that your yard’s grade is appropriate for it so it won’t flow back toward the foundation.
Step 4: Install Pump Pipes
Install the sump pump in the basin according to the instructions provided. The process will vary by manufacturer and whether you’re putting in a pedestal or submersible model. Note: The instructions that follow are general and not specific to any pump model.
Pedestal pumps will be installed outside of the basin, while submersible pumps will be placed in the bottom of the basin, directly in the middle. Be sure that the pump float will not touch the sides of the basin where it can become stuck and cause the pump to work incorrectly (the float rises and falls with the water level in the basin — an essential part of its operation). Attach a length of PVC pipe to the corresponding outlet on the pump, enough so that the pipe extends up out of the basin by 1′ to 2′. Keep a tape measure and a hacksaw handy to cut the pipe to the required lengths to make the system work.
Next, install a check valve (it keeps water that’s been discharged from flowing back into the basin when the pump is deactivated) following the manufacturer’s instructions. You will be putting the check valve between the pump outlet pipe and another length of pipe that will run from the valve to the discharge pipe elbow joint you installed earlier in the rim joist. Connect this length of pipe to the elbow joint with PVC cement.
Step 5: Test the Pump
Plug the pump into a GFCI outlet and pour a bucket of water into the sump basin. Activate the pump to test that your new sump pump works and that the inside pipes don’t leak water. Go outside and ensure that the water is being discharged and that it is doing so correctly and away from your home’s foundation.
Step 6: Install Backup Pump (Optional)
Because a sump pump is powered by electricity, putting in a backup battery-powered pump is a good way to help protect your home from flooding. Power outages can often accompany heavy rains during a storm and if your home loses power, so does your sump pump. There’s also the chance of your sump pump malfunctioning. Discharge pipes can clog, the main pump can clog or fail, the float can get stuck or constrained, etc. Having a backup can ensure that your basement doesn’t flood and sustain costly damage.
Backup systems are available for purchase at your local True Value hardware store. Before installing the backup system, read all instructions carefully on how to properly operate it along with your main sump pump. Follow all instructions particular to the model you purchase. Note: This is a general guide on how most systems work.
You will install the backup pump as close as you can to the main sump pump, as you will be connecting the backup pump’s discharge outlet to the main pump’s discharge pipe using a PVC pipe T-fitting. The battery is usually mounted up and away from the sump basin to keep it away from any water, while the battery charger is usually kept away from the battery casing and is plugged into a GCFI outlet. After all connections are made, test the backup to ensure that it is operational, by pouring water into the sump basin with the main sump pump deactivated.
Good job! You’re done! You’ve taken the right steps to help protect your basement against flooding.
Project Shopping List
Here’s what you’ll need to complete this project successfully.
- Sump pump kit
- Level
- Permanent marker
- Jackhammer (Optional)
- Large sledgehammer or small sledgehammer
- Heavy-duty trash can
- Heavy boots
- Safety glasses
- High-powered hammer drill
- Pointed shovel
- Gravel
- Concrete mix
- Trowel
- Power drill
- Hole saw
- PVC pipe
- Elbow joint
- PVC cement
- Hacksaw
- Silicone caulk
- Splash block
- Tape measure
- Check valve
- Backup sump pump (optional)
- PVC pipe T-fitting