


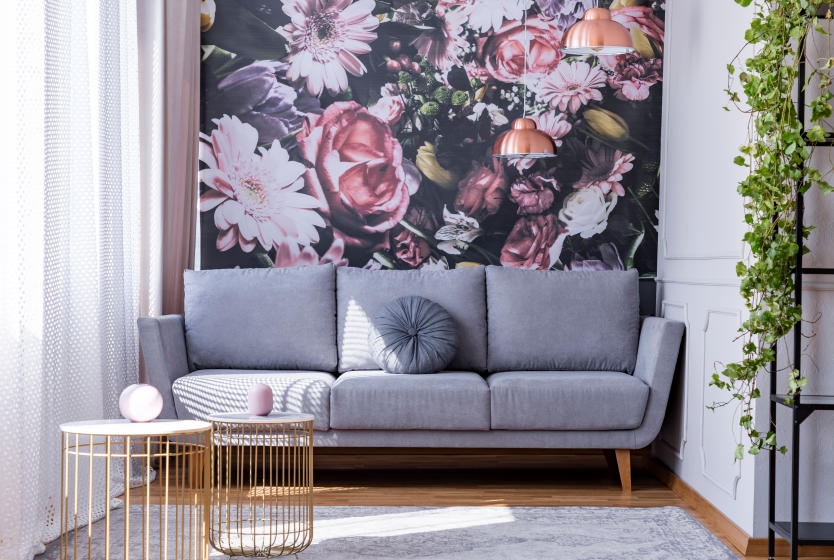
If you are tired of your plain, painted walls, hanging wallpaper can give any room a complete makeover. This project can take some time and effort, but it’s a task you can tackle in a weekend. In fact, choosing a wallpaper pattern can be the most difficult part of the job.
Know Your Paper
Preparation plays a key role in successful wallpaper hanging, so get to know wallpaper before starting.
Standard wallpaper can be somewhat difficult to work with because it tears easily when wet. You’ll need to use extra care when hanging so it doesn’t get damaged. However, standard wallpaper adheres to itself easily — if you overlap seams, the paper will stick together and not curl up at the seams. It can also stretch a bit if necessary.
Vinyl wallpaper is the most common because it’s durable and easy to hang. It also holds up well against moisture and humidity, so it’s well suited for kitchens and bathrooms. However, vinyl paper can’t be stretched and it doesn’t self-adhere. This makes it harder to line up two pieces because vinyl seams have to be butted up against each other or they will curl up on the ends.
Wallpapers are available in the pre-pasted and non-pasted variety. Pre-pasted paper has adhesive on the back that is activated by water. The adhesive tends to dry quickly, so the paper must be hung immediately after wetting it. Non-pasted paper has a dry backing. You’ll have to apply adhesive with an adhesive brush before hanging. A benefit to using non-pasted paper is that it doesn’t dry as quickly as the pre-pasted adhesive, giving you more time to hang the paper.
Step 1: Prep Your Walls
Before you begin, remove everything you can from the room. Any furniture left in the room should be moved to the center of the room and covered with drop cloths. Cover flooring with drop cloths for protection from spills. Remove any fixtures and hardware on the walls.
Remove any existing wallpaper from your walls using a wallpaper scraper tool and liquid wallpaper stripper.
Fill any cracks or holes in the wall using a joint compound and drywall compound or spackle. Sand any patched areas with a palm or circular sander until they are smooth and coat them with interior primer. Let the primer dry completely. If the walls are painted with a semi-gloss or gloss paint, give them a light sanding to dull the surface so the glue adheres better. Be sure to sand away any tiny bumps on the wall before hanging wallpaper — bumps will show through wallpaper. Run your hand over the sanded surface to make sure it is smooth.
Helpful Tip
Apply a coat of wallpaper sizing to the wall if necessary. This will help you slide the paper into place when hanging it on a wall with flat finish paint. Apply the sizing to your walls using a paint roller. It’s inexpensive and makes a better surface to hang wallpaper. If your walls have been primed, you can skip this step.
Step 2: Measure and Cut Paper
Using a sharp utility knife, cut the paper in advance to save time. Number each piece of paper at the top with a pencil so you can be sure you have the right size paper for each area. If the wallpaper’s pattern is random and you don’t have to worry about matching it up, you can cut many pieces at a time. If you have a pattern that needs to be matched, it is better to cut the pieces as you hang them.
Find a spot where you want to begin. If you have a pattern that needs to be matched up, the best place to start is a corner that is not noticeable, like behind a door, near drapes or in the far end of a room. Using a yardstick, a level and a pencil, draw a vertical line about ½” wider than the width of your wall paper. This line will be your guide, helping you hang the paper straight. Do this for each piece of paper to keep your wallpaper straight all the way around the room.
Step 3: Prep Paper
If you are using pre-pasted paper, submerge the end of the strip in the water tray. Slowly unroll the strip into the water and run it through the tray. Once the entire piece is in the water, pull it out and let it drip over the tray for a couple of seconds. Lay the paper on a table and fold the ends in so that glue is touching glue. This is called “booking” the wallpaper, and it gives the glue time to activate. Once the ends are folded in, fold the new ends into the center again, taking care not to crease the paper.
If you’re hanging non-pasted paper, you’ll have to apply your own adhesive. Lay the strip of wallpaper back side up over a big table or any flat surface. You can even use the floor — just be sure to lay down a drop cloth first. Use a paint roller or adhesive brush to apply a thin layer of wallpaper adhesive to the paper. Make sure to cover the entire surface of the paper to prevent air bubbles. Once glue is applied over the entire piece, book the paper as you would with the pre-pasted type.
Helpful Tip
Keep your work surface as clean as possible so glue does not get on the front side of the paper.
Step 4: Start Papering
Use a stepladder to reach the ceiling. Take the paper by the edge that will be placed at the ceiling, keeping the rest of the paper folded. Hold the wallpaper between the vertical line you drew and the wall by its upper corners. When it is centered, press the paper in the corner, leaving 3″ of paper at the ceiling and 1″ on the adjacent wall. Let the paper unfold and drop to the floor.
If the paper is hanging straight, smooth the rest of the paper onto the wall. Using a smoothing brush or smoothing knife, start smoothing from the ceiling down and from the center out. This will force out any air bubbles.
Wipe the wallpaper with a clean damp sponge to remove any glue residue and continue to smooth out any air bubbles. Make sure you rinse the sponge after each wipe to keep it clean. If you don’t rinse the sponge well enough, you could spread glue all over the wallpaper. Any glue spots on your wallpaper will be noticeable as they dry, and glue is very hard to remove when it dries.
Hold the blade of a putty knife against the paper in the corner where the ceiling and wall meet, and use a utility knife to cut off the excess paper at the ceiling. Slide the putty knife along the wall as you cut the paper. Once the paper at the ceiling is trimmed, do the same to trim the excess paper at the floor. Clean off any excess adhesive that got on molding or the ceiling with a clean, damp sponge.
Use a seam roller to press the edge of the wallpaper down. This will ensure that the edge securely adheres to the wall. Wipe the paper again with a damp, clean sponge, getting rid of any stubborn glue spots.
Step 5: Keep Papering
Move your ladder over to hang the second piece of wallpaper. Follow Step 3 for each piece of wallpaper you hang. If there’s a pattern to line up, hold the piece up by the top end and line up both pieces of paper. Press the wallpaper along the top where the pattern matches and let the folded piece of wallpaper unfold. Smooth the entire strip from ceiling to floor the same as you did for the first strip, this time making sure the seam lines up correctly. Flatten out any bubbles with a smoothing knife or smoothing brush. Follow the same steps for smoothing out the paper and trimming the edges as you did for the first piece of wallpaper. Make sure to run the seam roller over the seams. Repeat this process for the rest of the wall.
Step 6: Paper Around Windows and Doors
When applying wallpaper around windows and doors, line up the new piece of wallpaper at the top of the wall as you normally would, letting the excess paper hang over the opening. Smooth the wallpaper all the way down to the trim with a smoothing brush or smoothing knife. Make a diagonal cut in the paper where it hits the window or door trim. Press the paper into the crease where the wall meets the trim. Flatten the paper to the wall so the paper is hugging the window or door trim. Use a putty knife and a utility knife to cut away excess paper at the door or window trim. Wipe the window or door trim with a wet sponge to remove any glue. Follow these directions for the bottom corner of the window.
Step 7: Mind the Corners and Seams
To make crisp, clean-looking corners, smooth the paper into the corners with a smoothing knife while you are hanging it. In older homes, the corners may not be perfect and the paper may wrinkle. To get rid of these wrinkles, make a cut in the corner where the wrinkle begins and carefully cut down in the corner until the end of the paper, pressing the wrinkle out of the paper.
Once the entire room is wallpapered, check all the corners and seams to make sure they are not curling up. If they are, use a seam roller and press the seams back into place. If that does not work, apply a little glue to the seam and press it down with the seam roller. If you are using vinyl, remember that you cannot overlap two pieces of wallpaper, so be extra careful when checking these seams. If they are slightly overlapped, use border adhesive and seam adhesive to make sure they adhere to each other.
Step 8: Clean Up
Double-check that there is no adhesive on the wallpaper or your baseboards. Clean your tools with soap and water and throw away all the scrap wallpaper that you cannot use. Once the room is finished, you can return your furniture to the room, replace your switch plates and outlet covers and hang any decorations.
Nice work. With a little time and effort, you’ve given your plain walls a totally new look.