


Today I wanted to show you how I turned the new chalkboard wall in the kitchen into a gallery wall to hold the Bub’s artwork. I showed you the Christmas version of the wall a couple weeks ago:

The art on there started out like this:

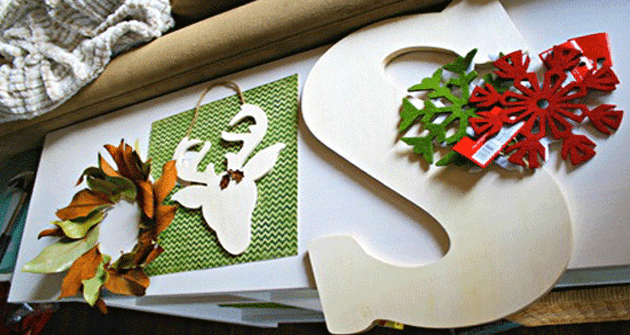
The small magnolia wreath didn’t make it up there, didn’t look right (I just hot glued the leaves onto a paper plate with the center cut out). The deer head was from Michael’s and I just glue the paper on like I showed you here.
The big “S” was from Michael’s too if I remember right. It stands for Sarah. I kid. It’s for our last name. 😉
I just gave it a quick stain with my dark walnut and called that done. The three felt snowflake ornaments were from Target for a buck each and I just stacked them on top of each other with a little hot glue.
The little paper poinsettia flowers were just hot glued together after I free handed the leaves and cut them out:

I just did one leaf and then traced it seven more times to get enough for a flower.
So I had a plan to make this wall more function for art throughout the year too – I wanted to make it so I could use magnets on the whole wall, but did NOT want to mess with magnetic paint again. I tried that before and even with one meeeellion coats, it doesn’t magnetize well.
So I came up with an idea, courtesy of the roofing area at True Value – I grabbed a few of these small metal sheets:

I have NO clue what they are for – I just know they were cheap (about a dollar each) and they were magnetic.
I learned years ago you need to find the right metal for these types of projects – magnets will not stick to so much of the metal sheeting you find at the hardware store. You need to look for galvanized metal – when in doubt, take a magnet with you (that’s what I do!).
I just put them up with tiny nails:

The holes are perfect!
I centered them in each frame:

They aren’t big, maybe 2 1/2 inches by four? So either direction worked.
It took just a few seconds and I was able to use my magnets to get some art up:

I can use my cute DIY magnets I made a couple years ago – they’re just scrapbooking brads with the prongs pulled off, then magnets glued on (I used Liquid Nails):

I kept the S for Sarah up 😉 just because I think it looks cool, but I’ll probably replace it to put bigger art in there:

It’s a great spot for school papers, art work, cards – I hung two cards up:

The Bub is obsessed with writing us notes lately, and the other day he pulled out a few of my random greeting cards and wrote us sweet messages in them. It was too darn adorable for me to be upset about the losing the cards. 😉
So there you go, a chalkboard art wall – with magnets! The whole project only cost about $5 because I had the chalkboard paint, the frames and the magnets. I LOVE this new wall! And we still have plenty of room to write our lists and notes and the kiddo can still draw all over it too.
A little fun, a little art, a little organization – that’s what I’m talkin’ about!
Happy New Year to you!! Please stay safe and have fun!! See you next year! HAR. 🙂